
Unplug all of the flying leads from the motherboard (3 red, 3 black, 1 purple) and repeat the test, with the same results.
The unit will typically have been taking longer and longer to turn on as the capacitance drops lower and lower until finally it no longer starts at all.
Replace C9 with a 220µF 25V 105°C electrolytic capacitor and soak test the unit.
When switching on the supply again with no load the terminals will show their nominal +5V (on red) and -5V (on purple).
Typically, the power supply will have worked perfectly last time it was used as this part fails over a single on-off-on action.
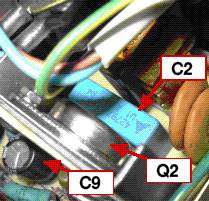
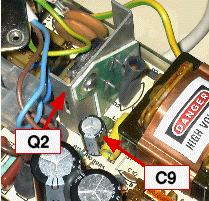
Replace the vertically mounted Q2 with a BU208A TO3 case transistor and soak test the unit. In the BBC Master series power supply this is a Hitachi 2SC2928 TO3 case transistor instead.
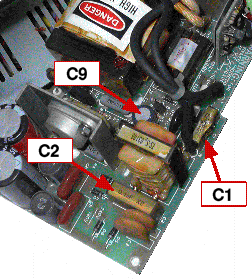
The problem is that the 100nF filter capacitor C2 has perished, usually because of small cracks in the plastic between the layers of foil which when exposed to mains potential break down - melting the plastic. It's counterpart, C1, is also prone to failing but is a 10nF value.
Replace the C2 (and/or C1) with a 15mm pitch class X2 rated 250VAC capacitor and soak test the unit.
| 
|
| BBC Micro supply (capacitor C1 not shown) | |
| |
| BBC Master supply (reference designators may vary on different board versions) | |
Warning! The voltages inside the power supply when running are potentially lethal. Do not attempt a repair unless you are competant to do so and have disconnected the power supply from the mains. Remember that the large capacitors in the supply also store charge for many minutes unless discharged safely.
The tape filing system and ROM filing system in pre-Master machines are examples of filing systems which do not offer the service.
There is an example to study, which gets the names 1 at a time and prints them out.
More details can be found on page 341 of the "Advanced User Guide" (ISBN0946827001).
It quickly glosses over the subject on page G.1-4 and F.7-6. The following document covers the three cases when your filing system must respond in order for it to behave correctly, along with some rules about what to do and not do.
Download the three special cases to code for
The connector pinout is [1] R [2] G [3] B [4] Sync [5] ground [6] 5 volts.
Not all monitors are able to deal with the composite sync: it is possible to use an LM1881 sync separator to recover the horizontal and vertical syncs, but infact the separate syncs are present inside the machine from pins 39 & 40 of the 6845 CRTC. They will require buffering suitably before connecting directly to a monitor.
As the micro only ever outputs binary levels on the RGB port the loss required to get from 5V peak to peak to nominally 1V peak to peak can be achieved with some small signal diodes, eg.IN4148. With the Microvitec Cub the input stage is a 150R series resistor driving into a logic gate.
You might consider a scan rate converter (basically it resamples the incoming video picture then outputs it again at the framerate and levels that the monitor expects) or if appropriate simply fit a TV card to your PC and use the composite video connector instead.
Driving a SCART TV is a little simpler, the easy approach being to use the composite video output directly, but there is a notable picture improvement by using the component video. Again, the TV will expect 1V peak to peak when driving into a 75R load, should accept the composite video output as sync information (though a simple R-C low pass filter would be better, or derive a sync from an attenuated digital sync), and already supports the correct field rate and resolution.
A charge pump from the 5 volt supply on the RGB connector could also be used to drive the 12V SCART switching line to make the set automatically switch channels when the micro is powered up.
The very early Master 128 computers were fitted with Lithium cells mounted in a recess next to the cartridge slots, however due to reverse current charging the cells in these machines were prone to bursting into flames so the design was modified to use a shrink wrapped pack of 3 primary cells.
Replacing the pack requires two passive components, plus it is advised that a 3AA battery box is used to hold the AA cells to make future replacements simpler:
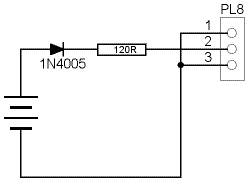
Note that the pinout of PL8 on the main PCB is reversible, so the 3 pin female plug need not be polarised. Use of leak-proof cells is recommended to avoid damage to the PCB.
The standard BBC microcomputer has a 6502A at its heart. This has been replaced by the 65C02 in second processors. The 65C02 may also be fitted to the beeb, where it will give 27 new 'legal' instructions, and will also reduce power consumption by around 80mA, a boon for sideways RAM/ROM board users!
Fitting the new chip to the beeb is simply a question of switching off, removing the old 6502A and replacing it with a 2MHz 65C02, taking care not to bend any of the pins in the process! In most cases all will be well, but a few beebs will then start throwing out spurious characters in MODE 0. If this happens to yours replace IC14 with a 74ALS245, normally this is just a plug in replacement.
All should now be well, but a very few machines may still exhibit problems.
If yours is one of these a little surgery is needed in an attempt to correct a circuit fault.

Details of the new instructions are available in the Master 128 Reference Manual, part 2, under the header 'The BASIC assembler'. Alternatively a Rockwell data sheet for part 65C02 will contain opcode details.
