

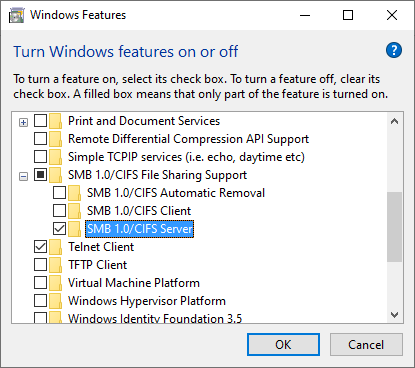
It isn't necessary to have the SMB 1.0 Client option enabled, only the SMB 1.0 Server, and to avoid having to revisit the setting again turn off the SMB 1.0 Automatic Removal option as shown.
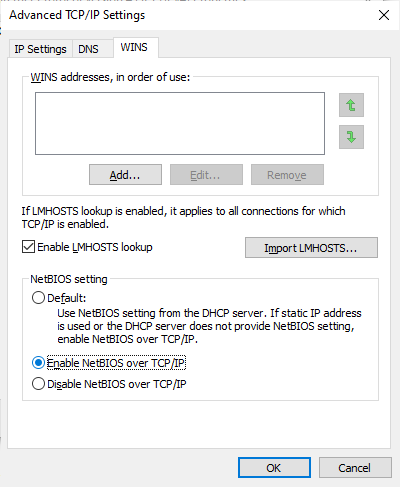
Next, turn on NetBIOS name resolution for whichever network interface is the one the Windows server is connected to the network on which the BBC Master Microcomputer is. This setting is on the WINS tab of the Advanced TCP/IP settings
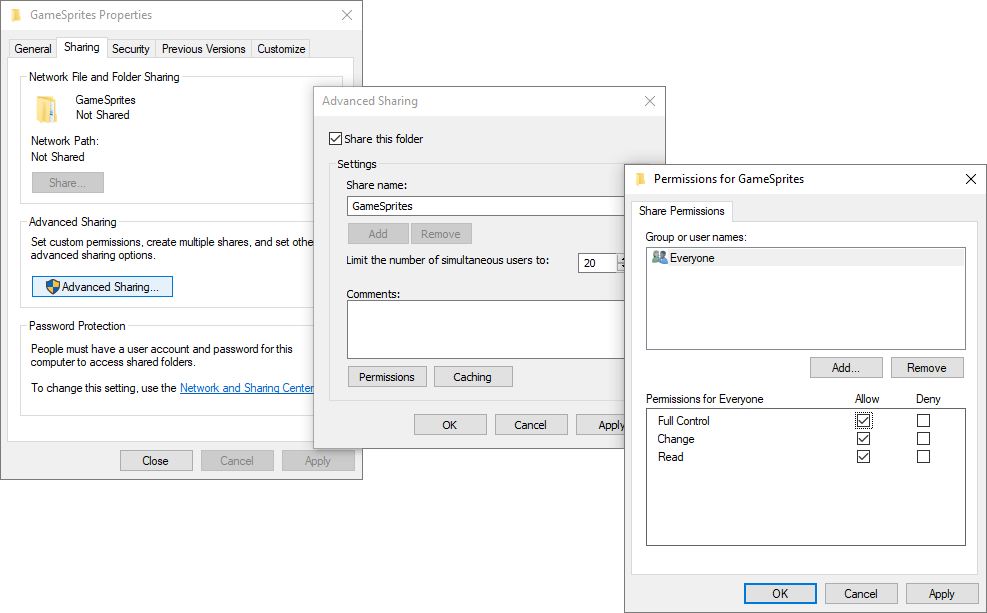
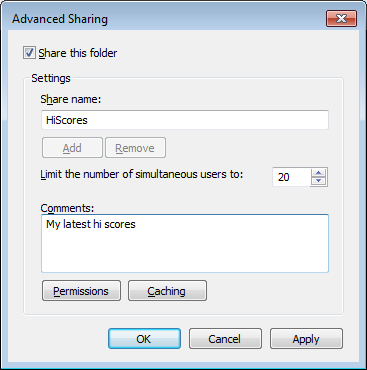
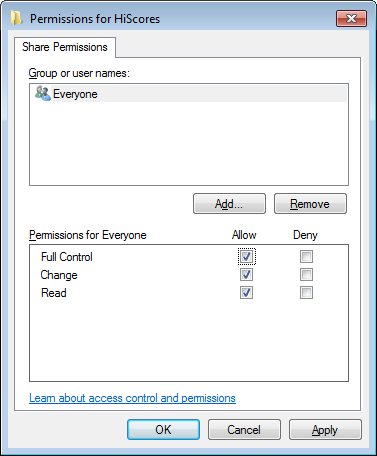
Select 'OK' to set the permissions, and 'OK' to begin sharing, and 'Close' to dismiss the properties box. It is now possible to connect to this shared folder from the BBC Master Microcomputer using the credentials of an existing account on the PC
| *MOUNT \\ENDOR\GameSprites username password WORKGROUP |
would log on to a shared folder called 'GameSprites'. Note that the username must not contain spaces.
To save having to type the username, password, and workgroup each time these can be stored in the configuration file. This simplifies the command to
| *MOUNT \\ENDOR\GameSprites |
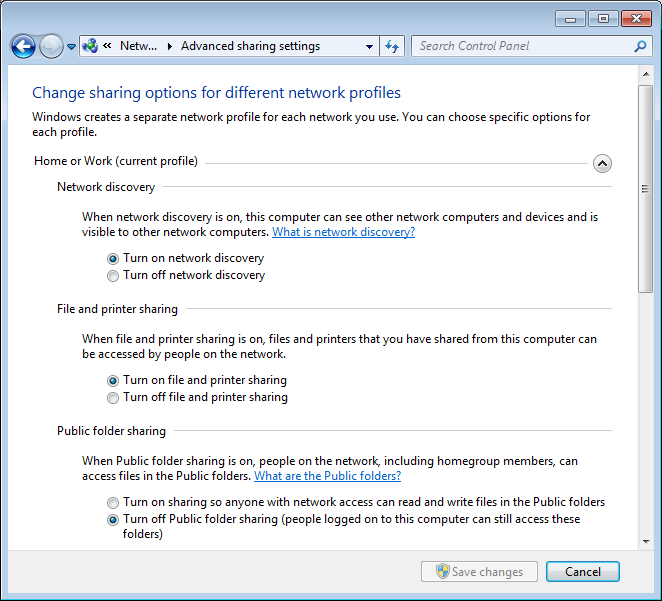
The remaining settings can be reviewed as follows
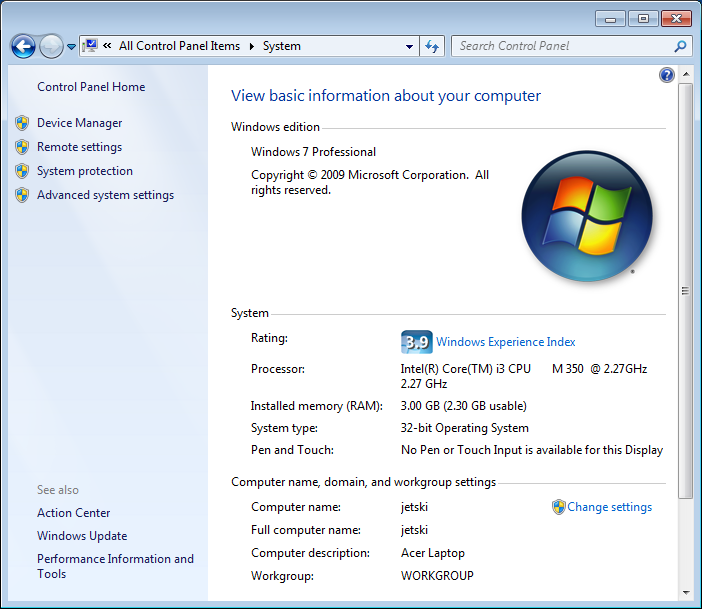
To discover which workgroup your PC is on right click on 'Computer' in explorer and choose 'Properties'. The workgroup is part way down the panel below the big round Windows logo, in this example the PC is called "jetski" and it is on the "WORKGROUP" network - but this can also be changed by clicking on the 'Change settings' button.
|
|
| Enabling sharing and adjusting access permissions | |
Select 'OK' to set the permissions, and 'OK' to begin sharing, and 'Close' to dismiss the properties box. It is now possible to connect to this shared folder from the BBC Master Microcomputer using the credentials of an existing account on the PC
| *MOUNT \\JETSKI\HiScores username password WORKGROUP |
would log on to a shared folder called 'HiScores'. Note that the username must not contain spaces.
To save having to type the username, password, and workgroup each time these can be stored in the configuration file. This simplifies the command to
| *MOUNT \\JETSKI\HiScores |
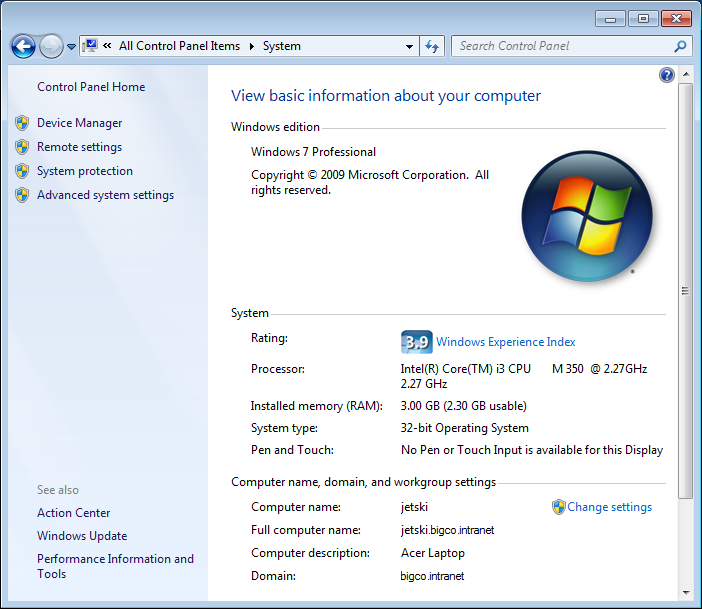
So in this example
| *MOUNT \\JETSKI\HiScores username password BIGCO |
would log on to a shared folder called 'HiScores'. If the domain controller is offline, the last parameter (the domain) can be substituted for the local machine name instead
| *MOUNT \\JETSKI\HiScores username password JETSKI |
assuming that the user called "username" had previously logged onto the machine when it was connected to the domain and hence does have an account set up locally already on the PC.
| *MOUNT \\MYPCNAME\SharedFolder username password workgroup |
The default workgroup is "WORKGROUP" and the default username and password are "GUEST" so it is only necessary to specify these if your network is configured differently. By using the defaults the command simplifies to
| *MOUNT \\MYPCNAME\SharedFolder |
To discover which workgroup your PC is on right click on 'My Computer' and look in the 'Computer Name' tab to find out what it is.
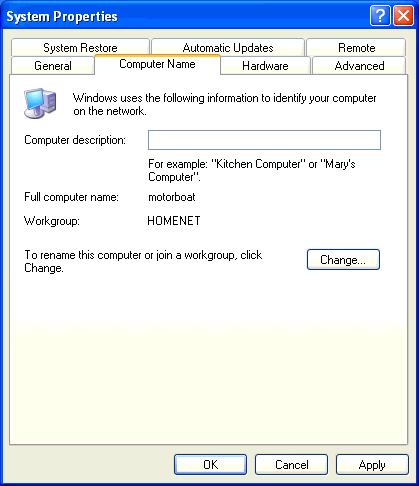
So in this example
| *MOUNT \\MOTORBOAT\BeebGames username password HOMENET |
would log on to a shared folder called 'BeebGames'. Note, in Windows XP Home the guest account actually accepts any password, even incorrect ones, to set a password that is checked consult knowledge base article KB555520 [archive] on how to do this.
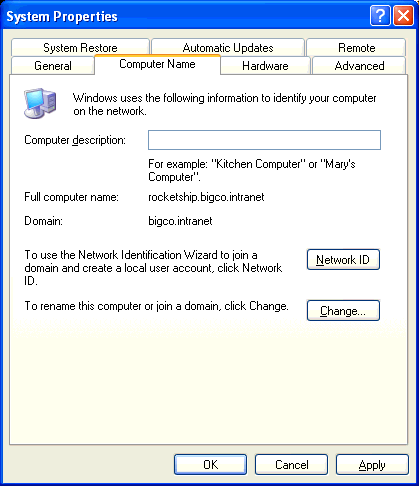
So in this example
| *MOUNT \\ROCKETSHIP\BeebGames username password BIGCO |
would log on to a shared folder called 'BeebGames'.
Firstly, it is necessary to know which workgroup the Mac belongs to. Navigate to the 'Network' pane of the 'System Preferences' application and select your active network connection. Click 'Advanced' to open the advanced settings screen (if you are not an administrator a password will be required at this stage). Click the 'WINS' tab.
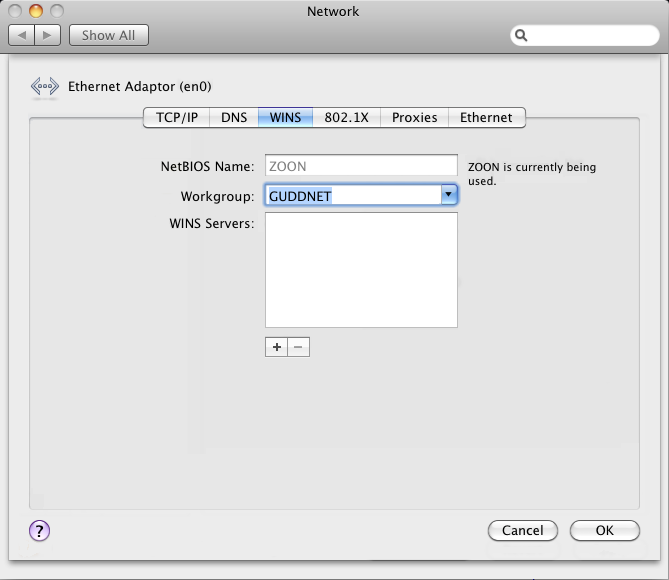
Make a note of the workgroup and use it if needed as directed by the user guide, as with Windows the default workgroup is called "WORKGROUP".
Next, ensure that file sharing via Samba is enabled. Select the 'Sharing' preferences pane as shown below.
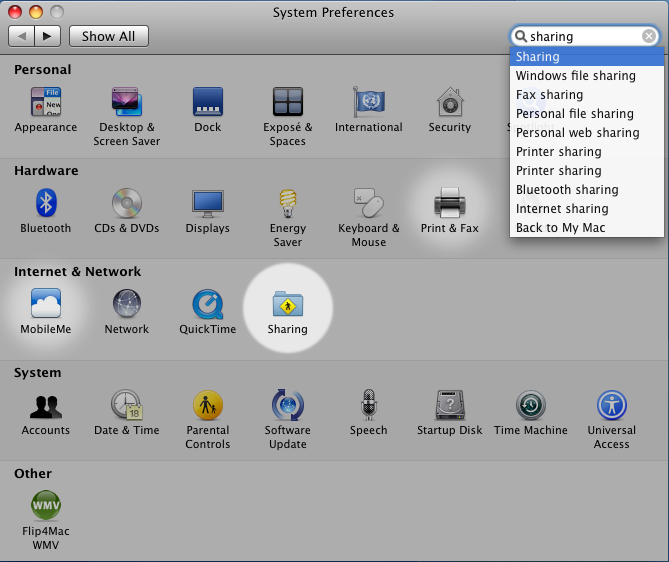
From within the file sharing pane, highlight 'File Sharing' and ensure it is ticked, then verify that no specific user names are ticked in the 'Users' list.
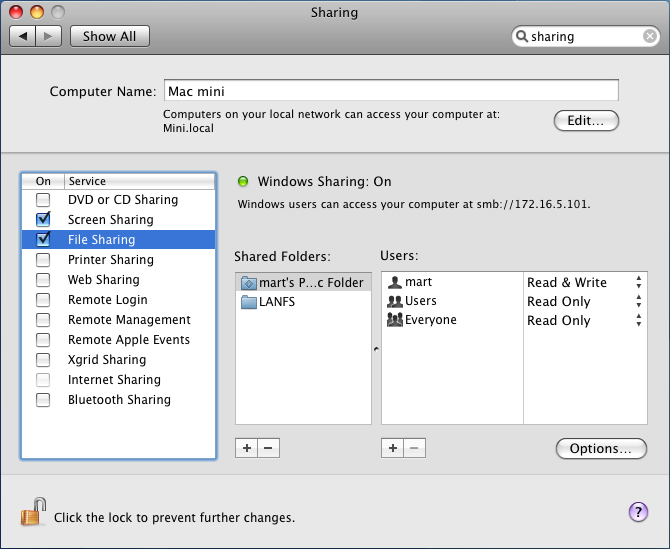
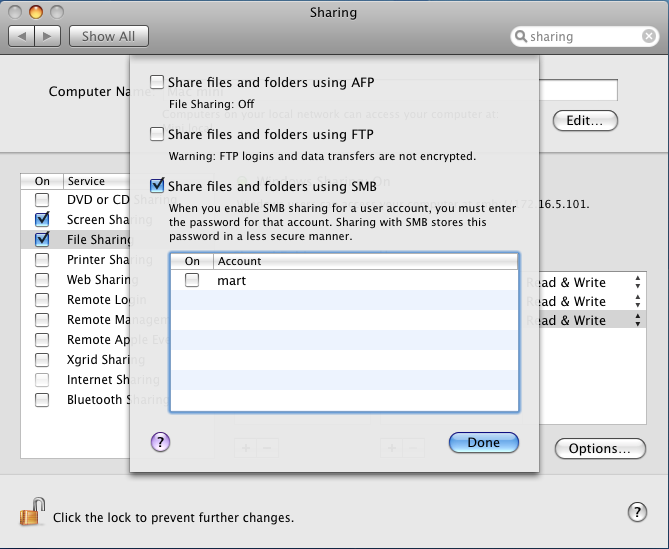
Now click on 'Options...' and ensure that SMB is selected. Any other selections can remain as they are, it will have no impact on the Master talking to the Mac.
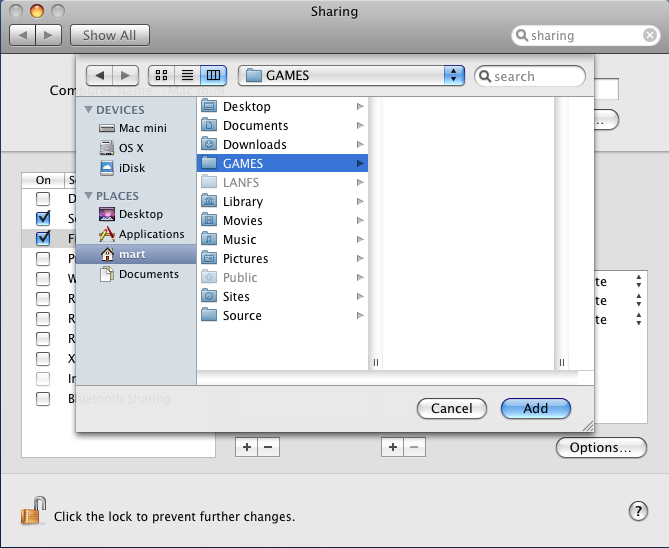
Now it is necessary to select a folder to share, in this example the share is going to be called 'GAMES' (it is not necessary to use all capitals, the Master can connect to mixed case share names too).
In the File Sharing preferences pane, click on the '+' sign at the bottom of the 'Shared Folder' box. This will bring up a standard file selection dialogue, navigate to the chosen folder 'GAMES' and click 'Add'. Note that the 'LANFS' and 'Public' folders are already shared on this computer and so are shaded because, unlike in Windows, a folder cannot be shared more than once.
The final part of sharing a folder is to set the sharing permissions for 'Everyone'. Of the available choices in the drop down menu the only sensible ones to use are either 'Read Only' or 'Read & Write' as 'No Access' and 'Write Only' are largely futile.
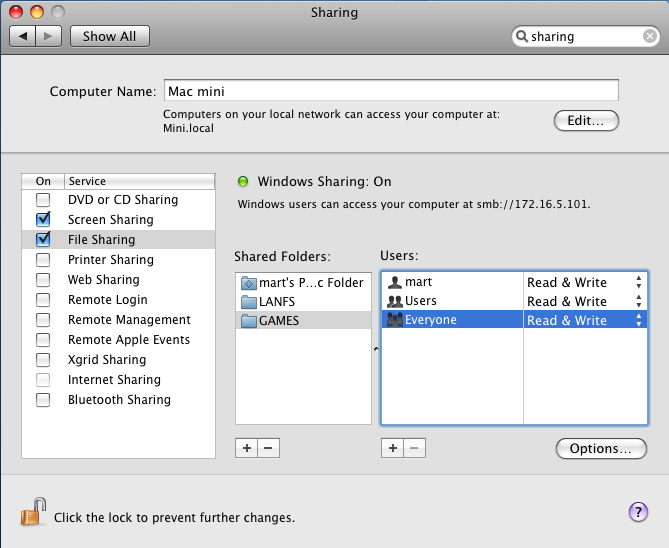
It may now be necessary to reboot the Mac OS X system for the changed settings to take effect, or to restart 'smbd' manually. Using the above example workgroup and folder names, mounting the new share from the Master would require the command
| *MOUNT \\ZOON\GAMES username password GUDDNET |
Sadly, Apple broke support for plain text passwords late in the release cycle of 10.5 (Leopard). According to reports on the subject, support was actually non-intentional anyway and (as of 10.6.2) it has not come back. It is thought that support may be returning in 10.6.3, but this is unconfirmed.
So at present, these instructions assume that guest access is in use - this is why it is vitally important that none of the usernames are ticked in the 'User' list in the file sharing pane. In general it is assumed that most BBC Master Microcomputers will be on closed private networks anyway, where guest access is not too large a security issue!
Following the above instructions will result in any new files or folders created from the Master being marked as belonging to the user 'nobody'. It is possible to map the 'nobody' user to an actual user.
Open a command prompt using terminal and edit the file '/etc/smb.conf'.
Find the line that reads 'guest account = nobody' and change 'nobody' to the account of your choice, in this example it has been mapped to account 'mart'. Be careful though if the chosen account has administration privileges as this effectively gives guest logins full control over your Mac OS X machine.
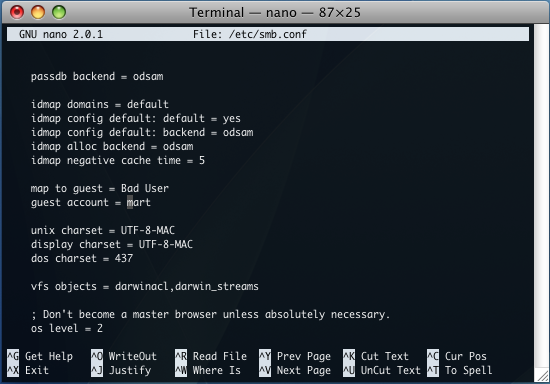
Save the file and exit, and reboot.
