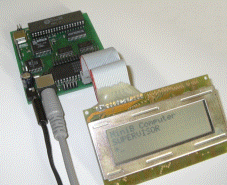

Where possible it has been designed with more modern, easy to obtain, surface mount components offering not only considerable space savings but cost savings too.
Architecturally the microcomputer is based heavily on the BBC Microcomputer series, and indeed a lot of software which will run on a BBC micro will also run on MiniB - including the original unmodified BASIC language.
All system control logic is implemented in a single 32 macroblock programmable logic device from Lattice Semiconductor.

The flash ROM which is not used for the operating system appears as 7 'sideways' ROM slots which can include filing systems, languages, and ROM filing system format ROM images. The original BBC BASIC ROM works without modification on the board, though to make use of it you must own one of the original physical ROMs from which the required binary can be extracted.
The MiniB OS provides the following commands (shaded items are accepted but no action taken at present)
| *BASIC | *HELP | *EXEC | |
| *OPT | *LOAD | *SAVE | |
| *FX | *CAT | *CODE | |
| *LINE | *KEY | *EX | |
| *RUN | *ROM | *SRREAD | |
| *SRWRITE | *SPOOL | *TIME | |
| *UPLOAD |
Can the MiniB OS be upgraded after the board is built?
Yes, the flash ROM can be programmed in circuit either by using a simple programming header from another BBC micro, or the MiniB can reprogram itself with the built in command SRWRITE.
Which PS/2 keyboards will work with MiniB?
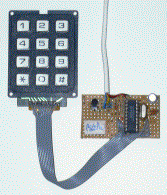
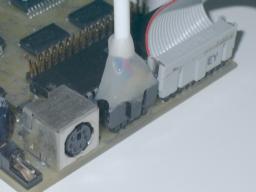
| Any keyboard which supports 'Type 2' keycodes. This is the vast majority of keyboards available, plus any keys which don't appear in the keymapping will be ignored (for example, the 'Windows start menu' key). For more custom applications the keyboard need not be a full 104 key matrix, for example a simple PIC and keypad can be combined to produce a PS/2 numeric keyboard for applications such as electronic key locks. |

|
| Prototype PS/2 numeric keypad |
As it doesn't come with BASIC installed, how do I run BASIC programs?
For the MiniB OS to start there must be at least one language ROM installed. In a normal BBC Micro this will be BASIC, but
this is not supplied due to copyright restrictions - instead to get you started there is a simple
language ROM which just starts a command prompt. Once at the command prompt you can reflash a sideways ROM with your own copy of BASIC using the built in flash tools.
What about compatibility?
| Product: | Compatibility: |
| Tube second processors | There is no hardware to support second processors, though requests asking whether the Tube is present will return the correct response. |
| Filing systems | All of the filing system vectors are present, all that is required is for a filing system which communicates with its hardware over the 1MHz bus. For example, the 8Mbyte RAM disc and RAMFS or IDE harddisc interface are ideally suited. The ROM filing system comes as standard. |
The programmable logic fuse maps are supplied here for reference purposes:
Once in RAM it is a simple matter of using the SRAM utilities which, despite their name, are actually flash ROM programming utilities. For example the flash utility SRWRITE is the same as in a BBC Master. They are used as follows:
A sideways ROM upgrade sequence for a 16k image would then be performed by entering
An OS upgrade sequence for a 12k file would then be performed by entering
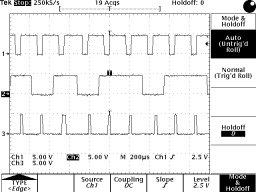
The protocol is very simple: a single data bit is clocked with nSTROBE and the host PC will then poll until the MiniB acknowledges by dropping the nACKNOWLEDGE line on the printer port.

| 
|
| The nSTROBE, DATA, and nACKNOWLEDGE on the data lead | |
Due to using the VIA port A lines are being used a bit like a serial port with handshaking the datarate
is lower than that which could be achieved if the true 8 bit parallel port was used, unfortunately that would
mean losing the LCD display!
Fortunately as the typical size of the flash images are quite small the fact that the datarate is only
around 530 bytes/s doesn't impose excessive inconvenience - a 16k ROM takes just over half a minute.
The lead is easy to build as it uses only 3 conductors plus ground.
| Pin on parallel port | Pin on 10 pin header |
|---|---|
| 1 (nSTROBE) | 6 (CA2) |
| 9 (DATA bit 7) | 10 (PA7) |
| 10 (nACKNOWLEDGE) | 8 (PA6) |
| 11 (BUSY) | 0V |
| 18-25 (GND) | 0V |
The upload software is supplied for the PC along with a tokenised BASIC program on which versions for other hosts can be based. Under Windows 2000 and Windows XP the parallel port registers are protected and will need to be made accessible using the free program 'Userport' by Tomas Franzon, or equivalent.
These computers are available now, and are offered in various different options depending on how confident you are at soldering. For most installations, you'll need an LCD display so you can see what you're typing plus a PS/2 keyboard from a PC supplier:
| Option: | Price: | Comments: | ||||||
| The PCB ready fitted with the 2 programmed parts |
| You source the remaining components (Digikey/Farnell/etc...) You build the board as per the instruction leaflet Buy a 20x4 LCD display (the one featured above is the same one used in the LCD project) Plug it in and away you go | ||||||
| Buy the finished board |
| The option if you're not happy working with surface mount Receive a built and tested board Buy a 20x4 LCD display (the one featured above is the same one used in the LCD project) Plug it in and away you go | ||||||
| 20x4 character LCD with 6" ribbon cable |
| HD47780 based chipset as featured above |
